> ## Documentation Index
> Fetch the complete documentation index at: https://docs-next.gallabox.com/llms.txt
> Use this file to discover all available pages before exploring further.
# Workflows for Kylas
> Send automated WhatsApp messages using Kylas CRM. Set up a workflow to send template messages when a lead is created. Follow our step-by-step guide in the CRM settings.
### WhatsApp Messages from Kylas
You can send a template message as soon as a lead gets created in Kylas CRM.
You can send the Template message(s) that is/are verified by **META**.
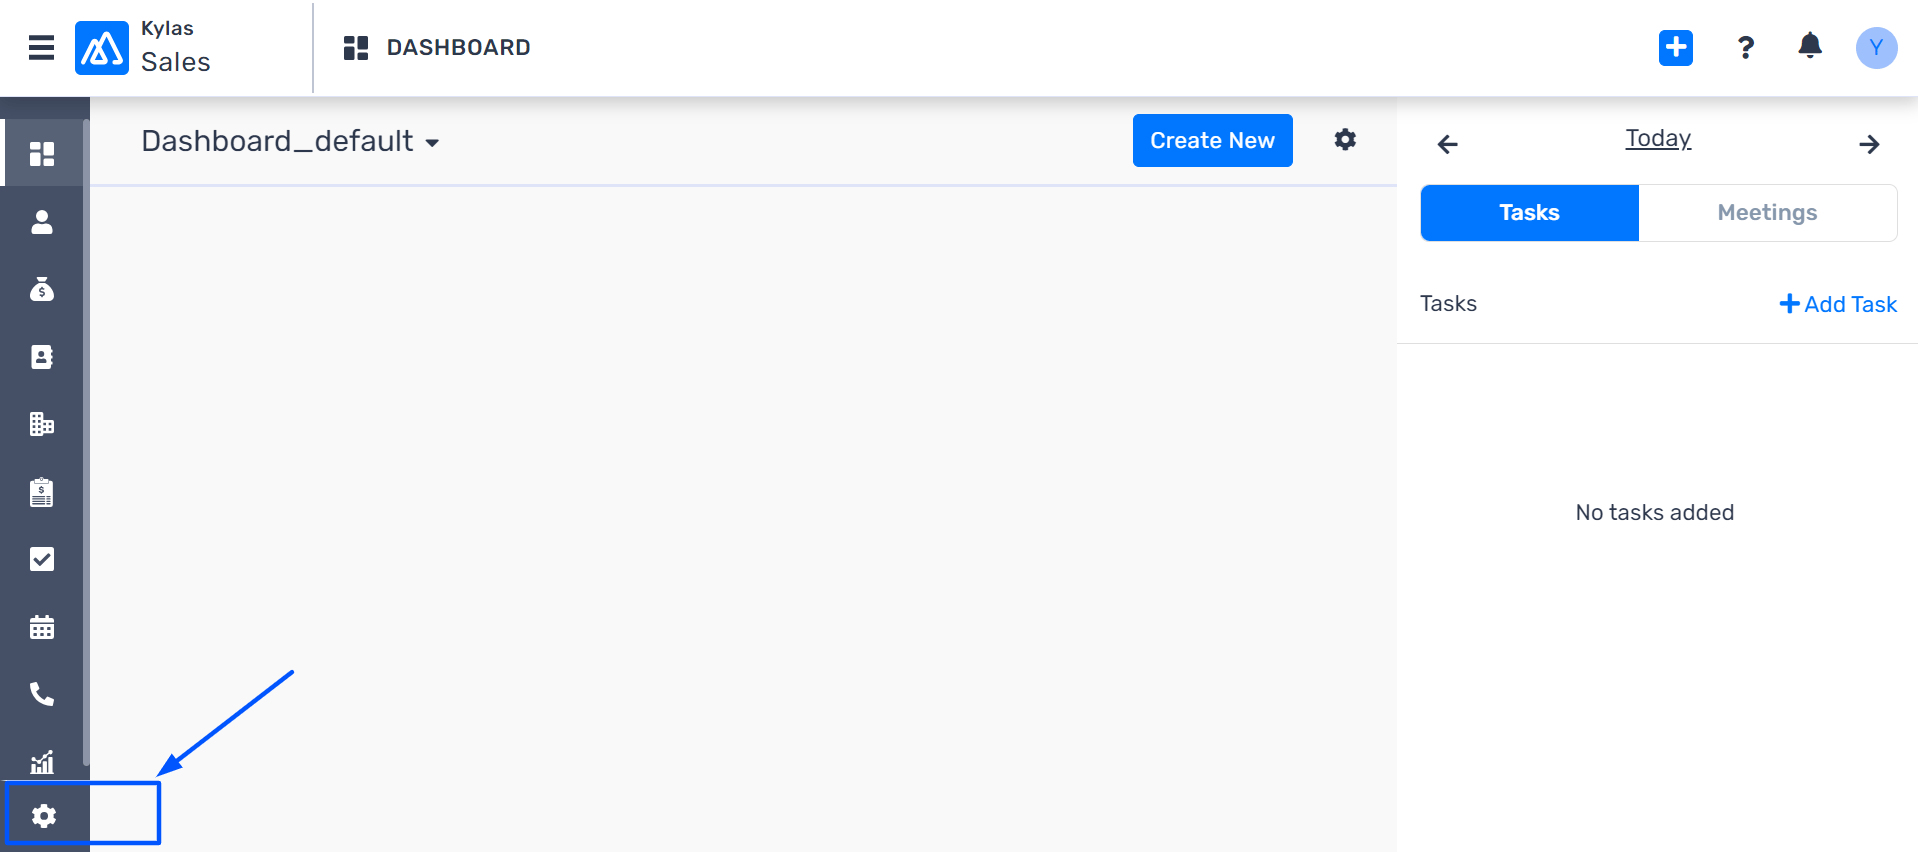
1. Go to your Kylas CRM and navigate to CRM Settings at the bottom left of the navigation pane.
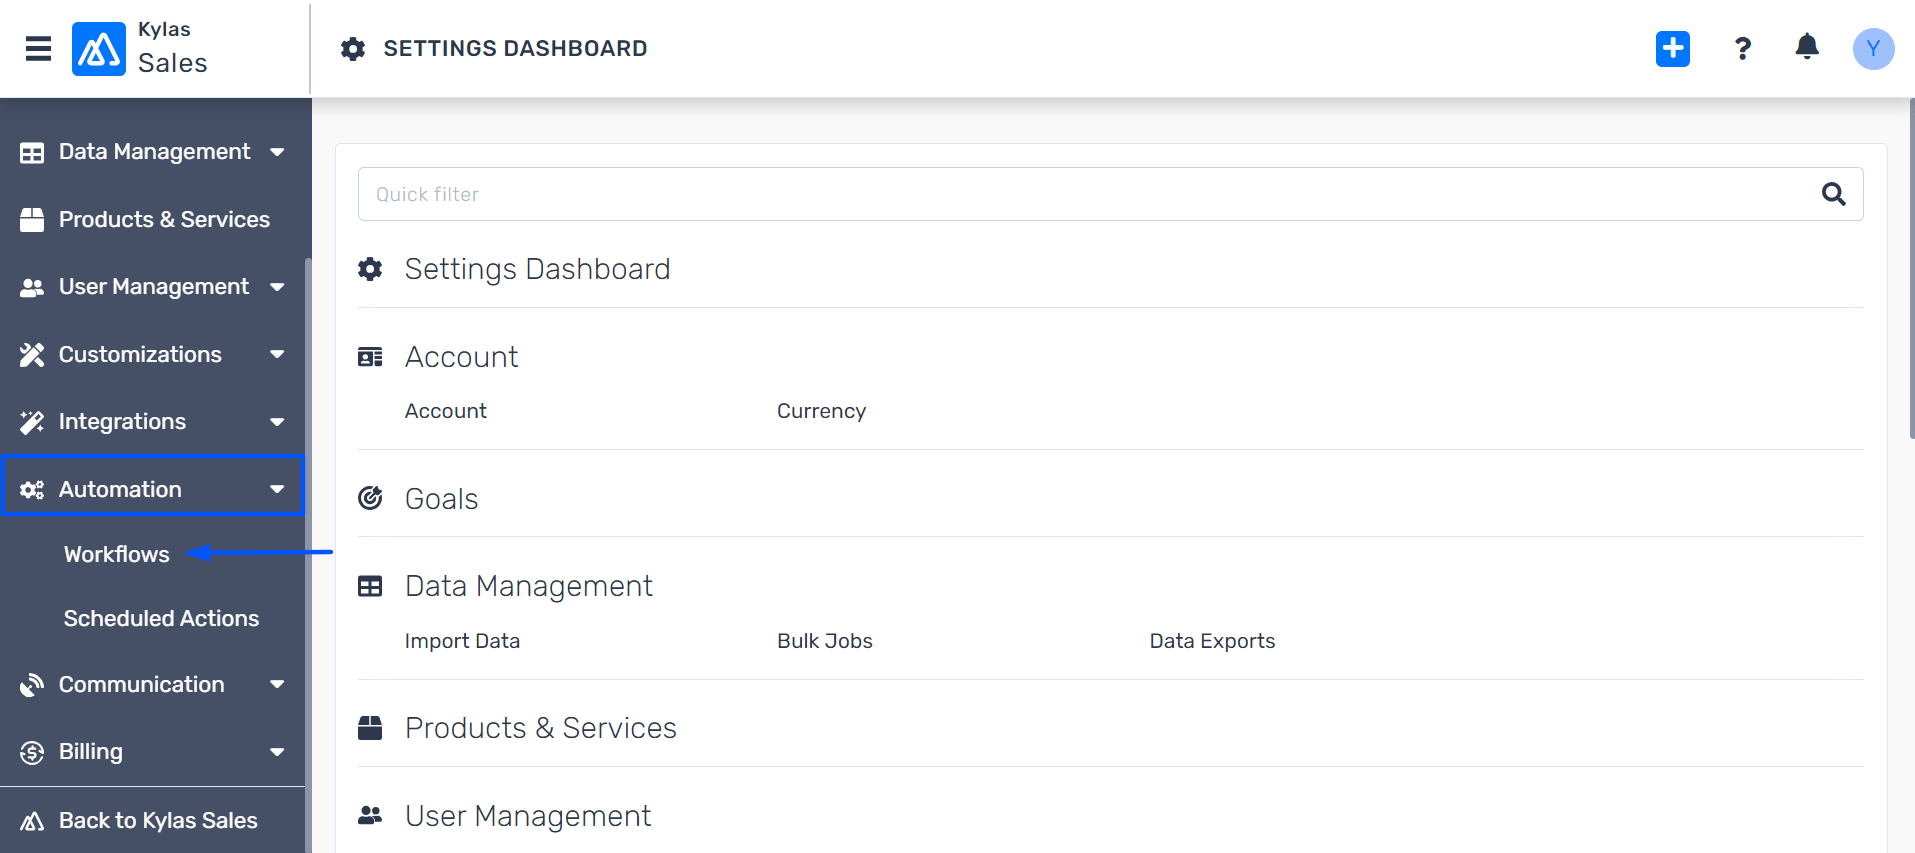
 2. In the CRM Settings, navigate to **Automations**. Under Automations, you will get the Workflow. Click on it.
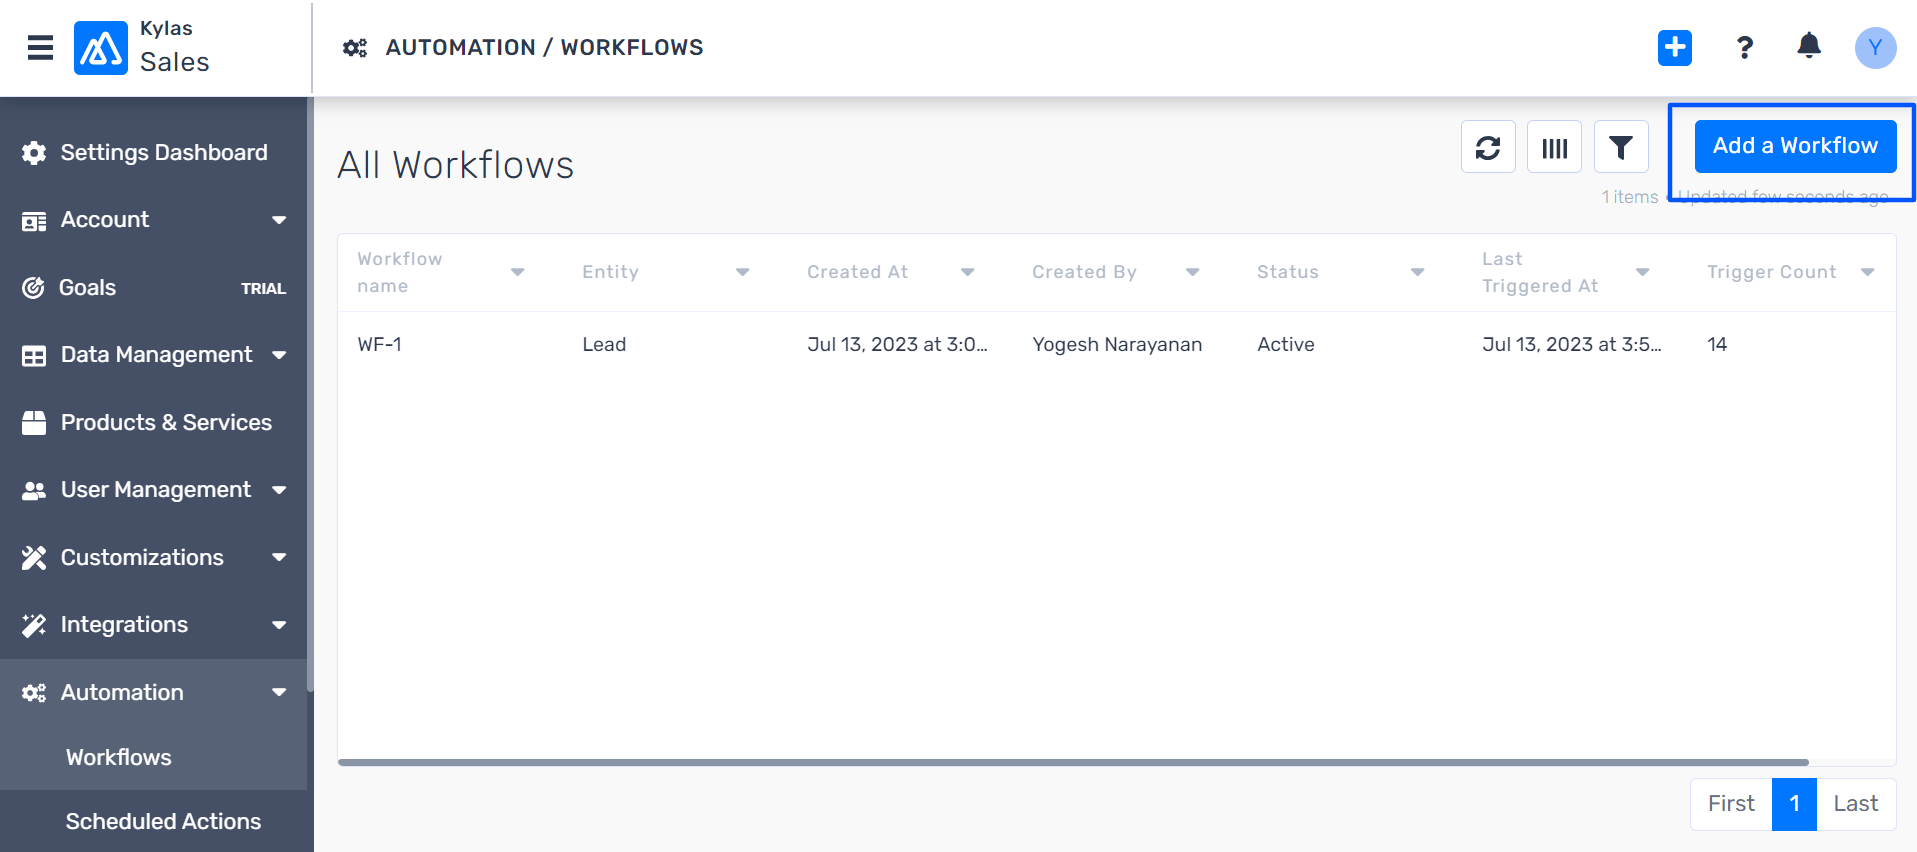
 3. Click on Add a Workflow as shown in the picture below.
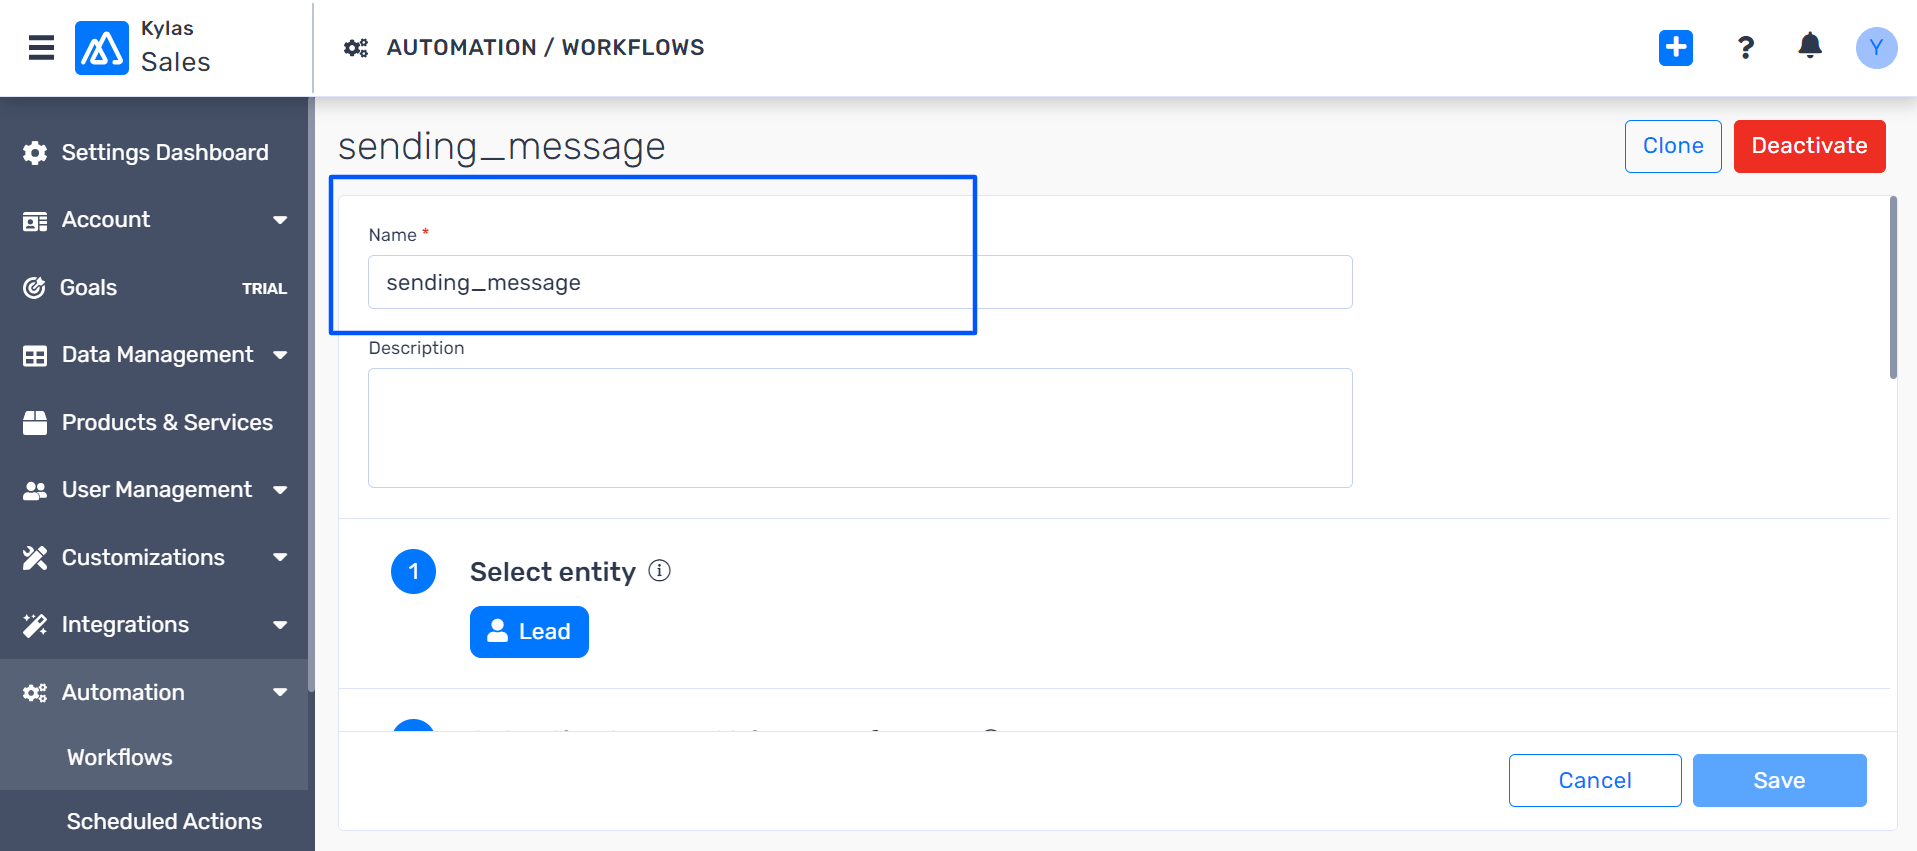
 4. After clicking, it will ask you to Name your Workflow, and let's name it **sending\_message.**
 5. Choosing the Entity is the next step. Options available for Entity are Lead, Contact, Deal, Task, Call Log, and Meeting. Select from the options you would like to create an automated flow for. We will take Entity - Lead to create an automated flow as an example.
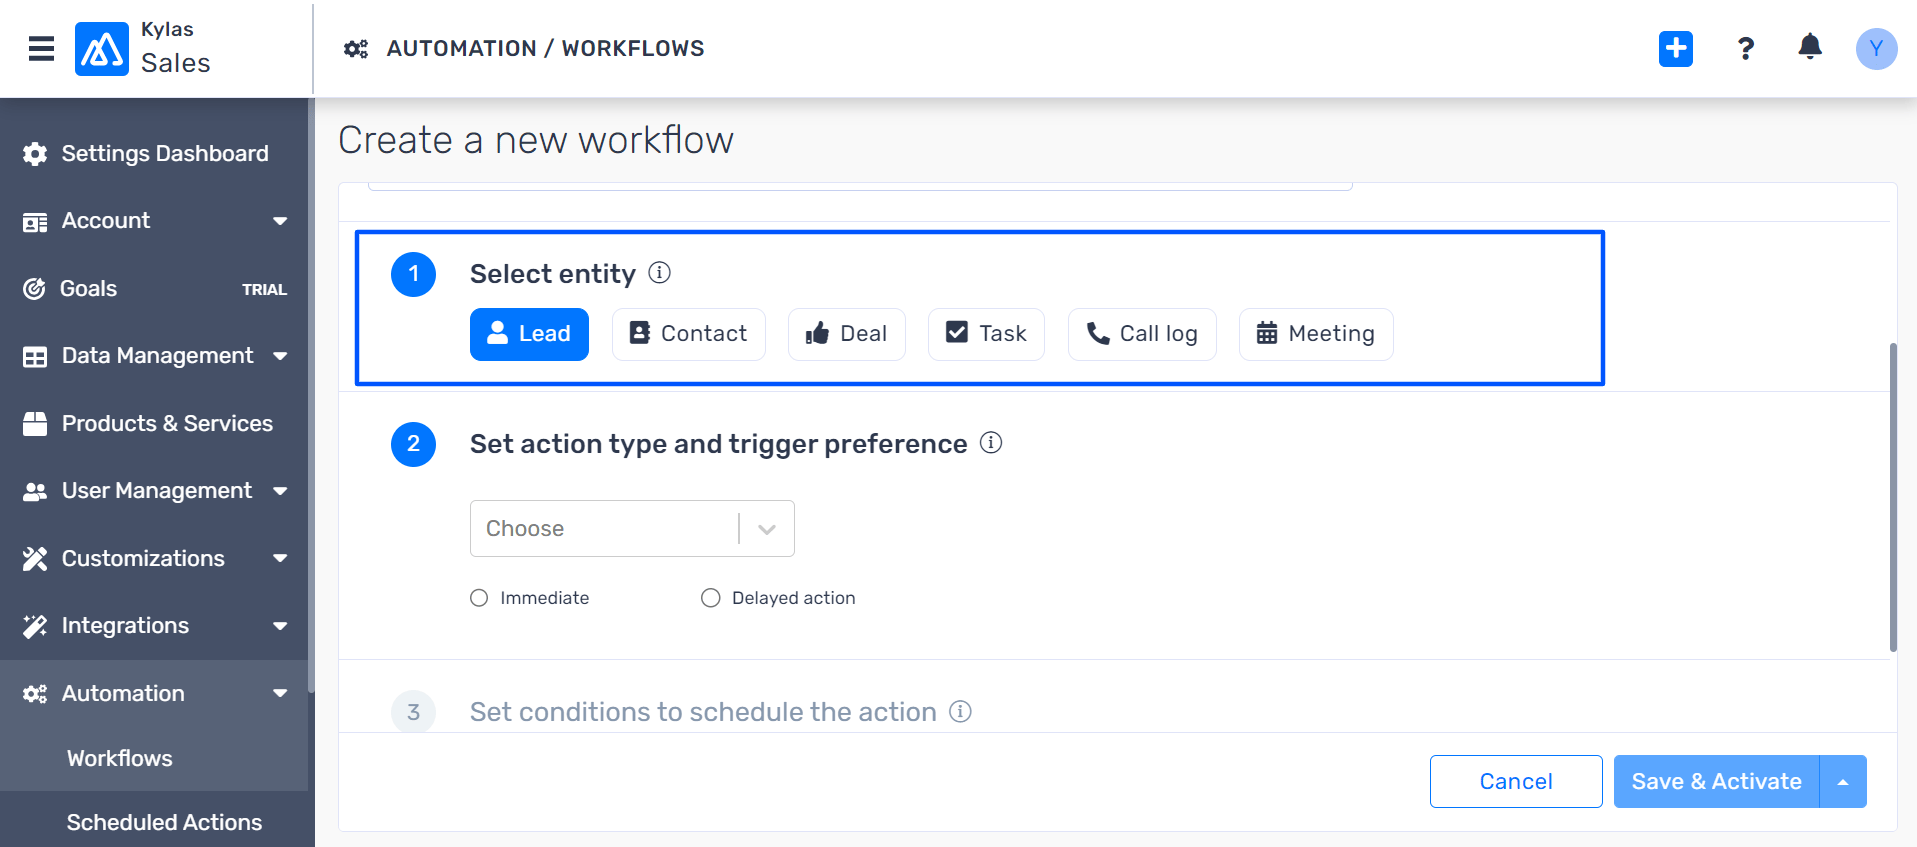 6. Next is selecting an action type and trigger preference to your workflow.
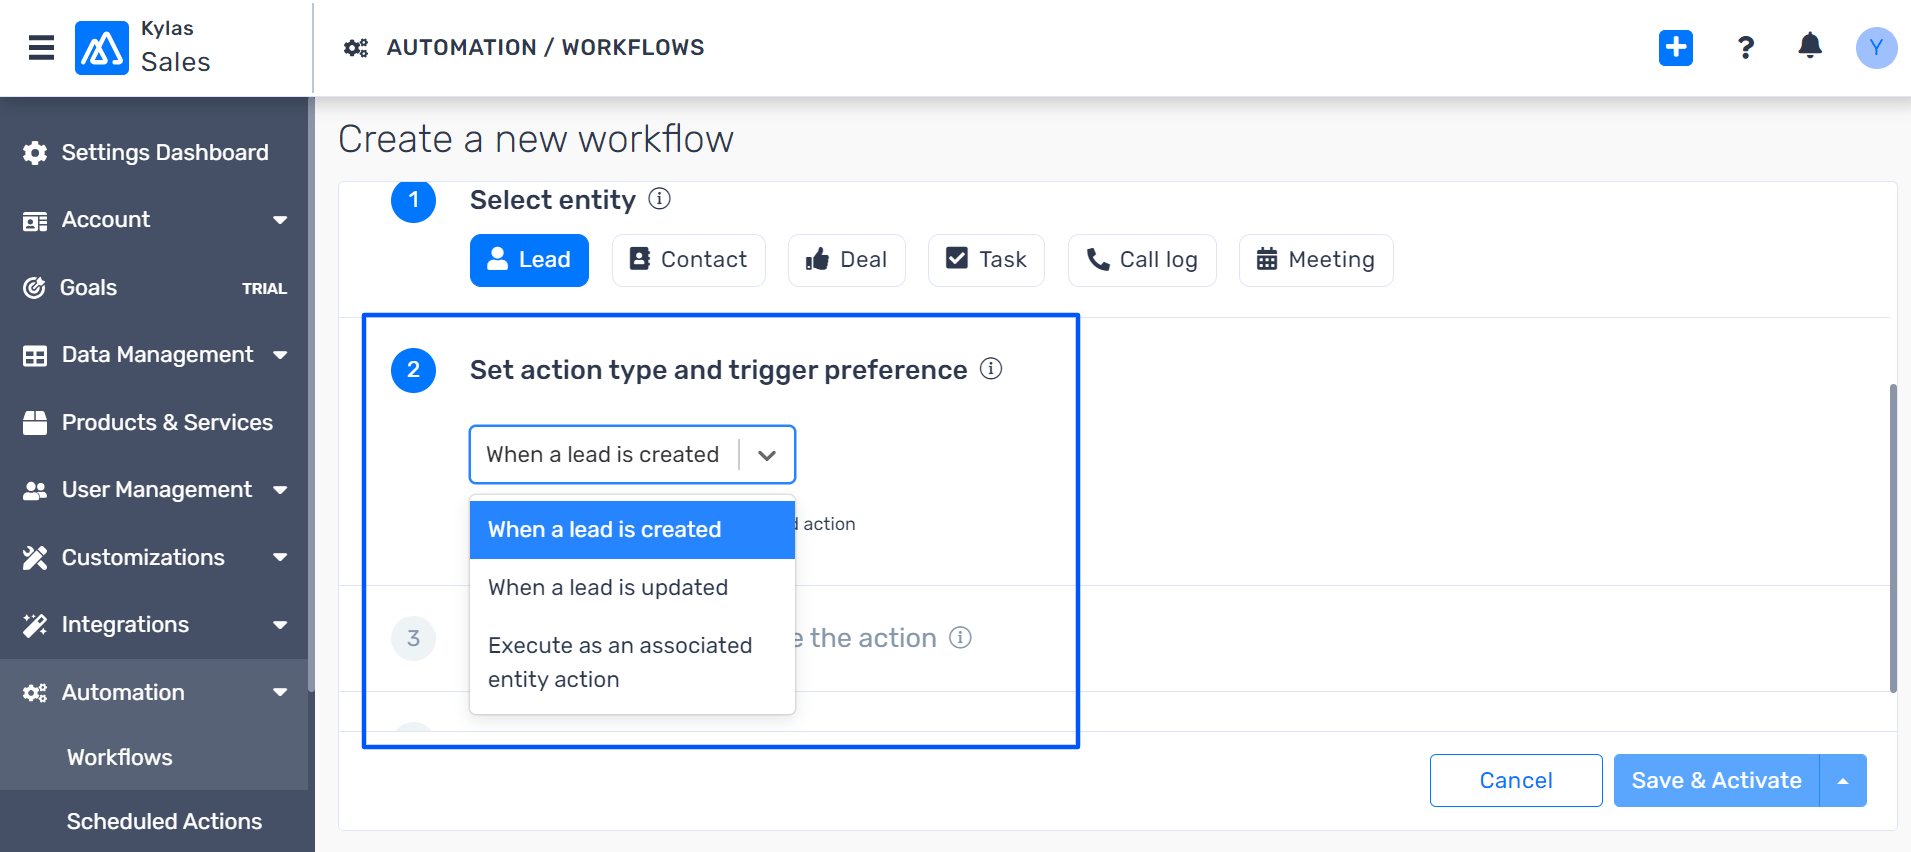 7. We will take the action type as **When a Lead is Created** and the trigger as **Immediately**.
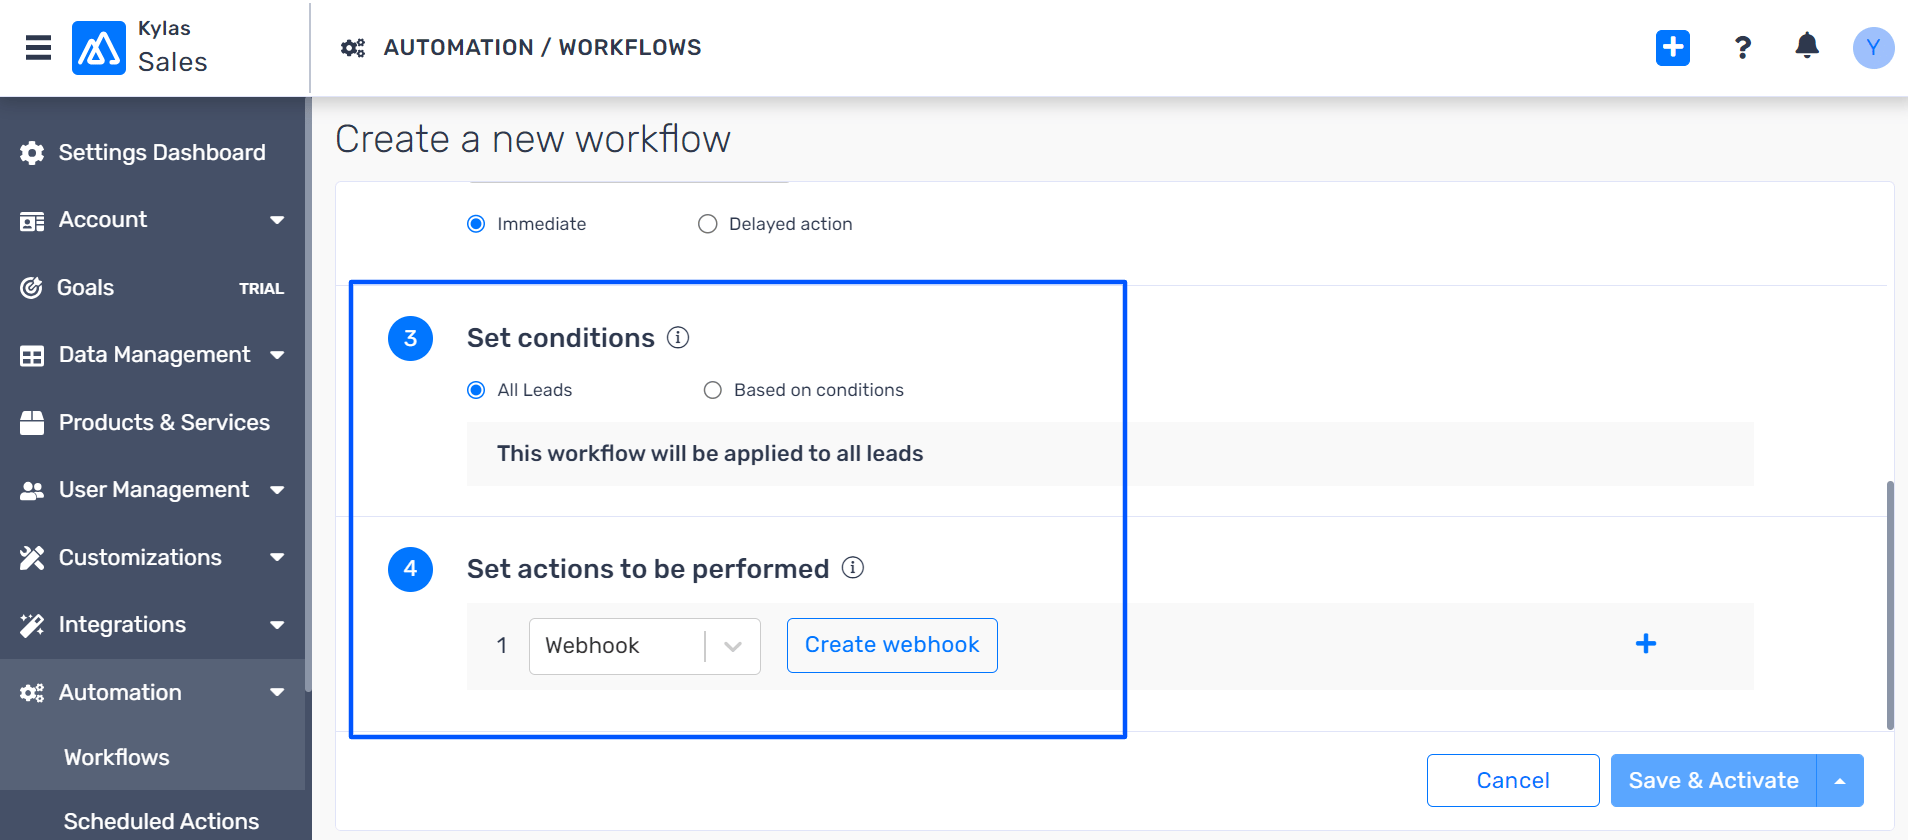
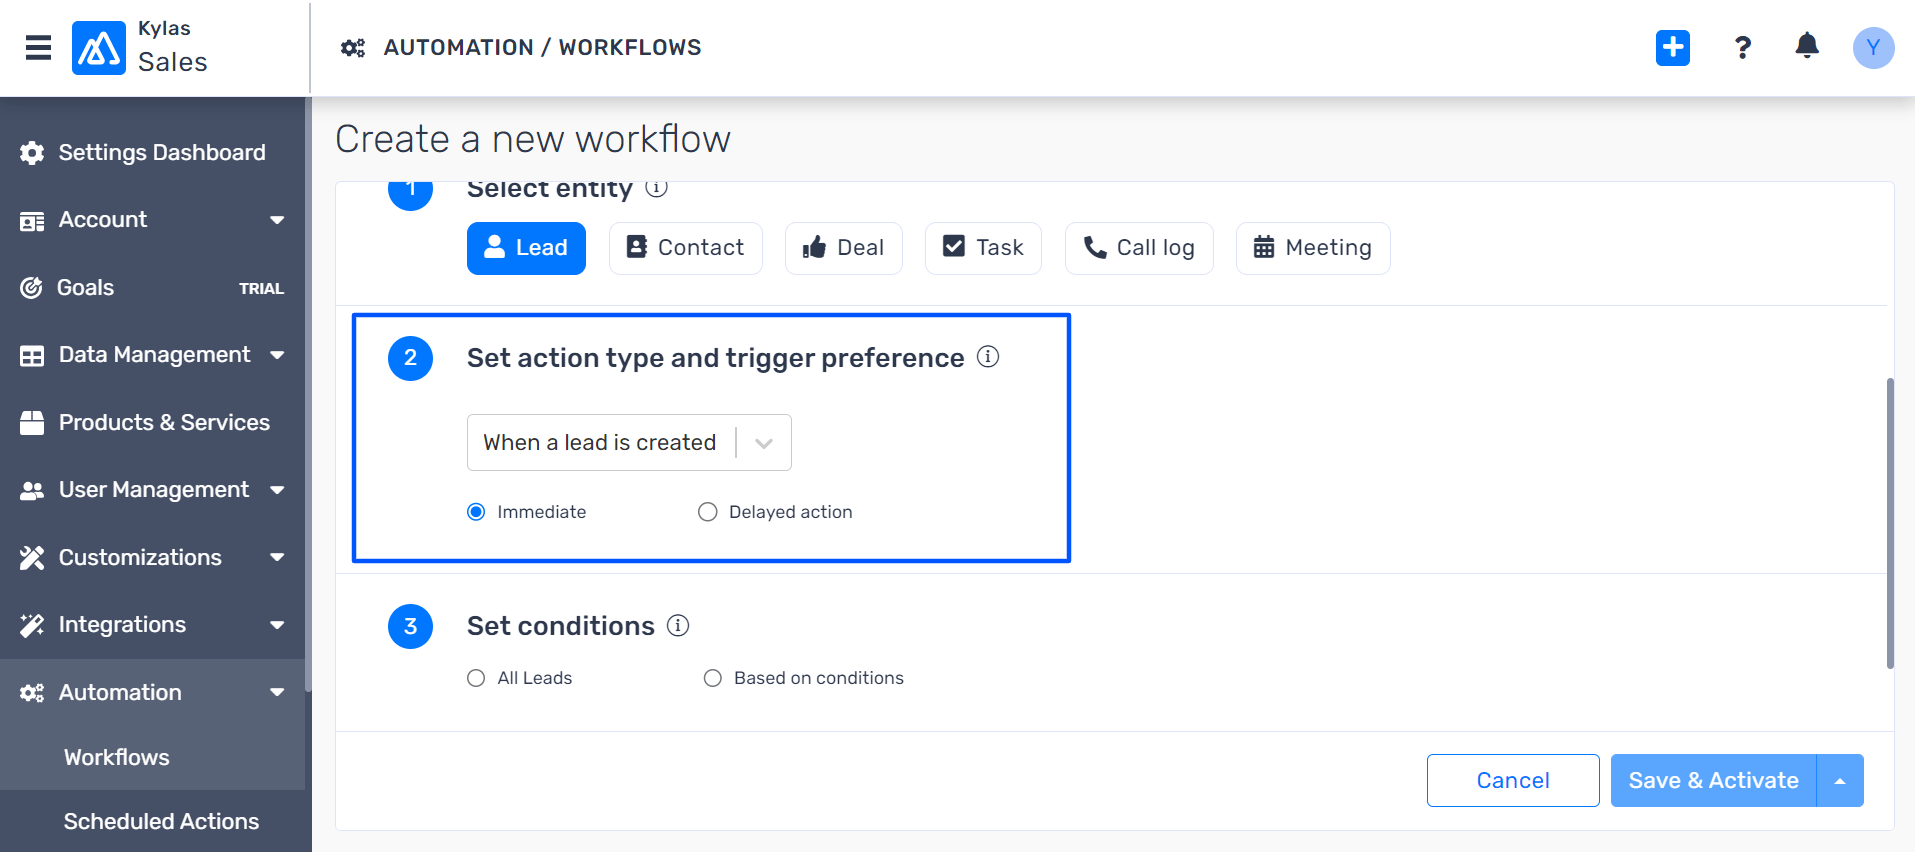 8. Next is setting conditions and the action to be performed automatically. We will take the Condition as **All Leads**, and the action as **Webhook**.
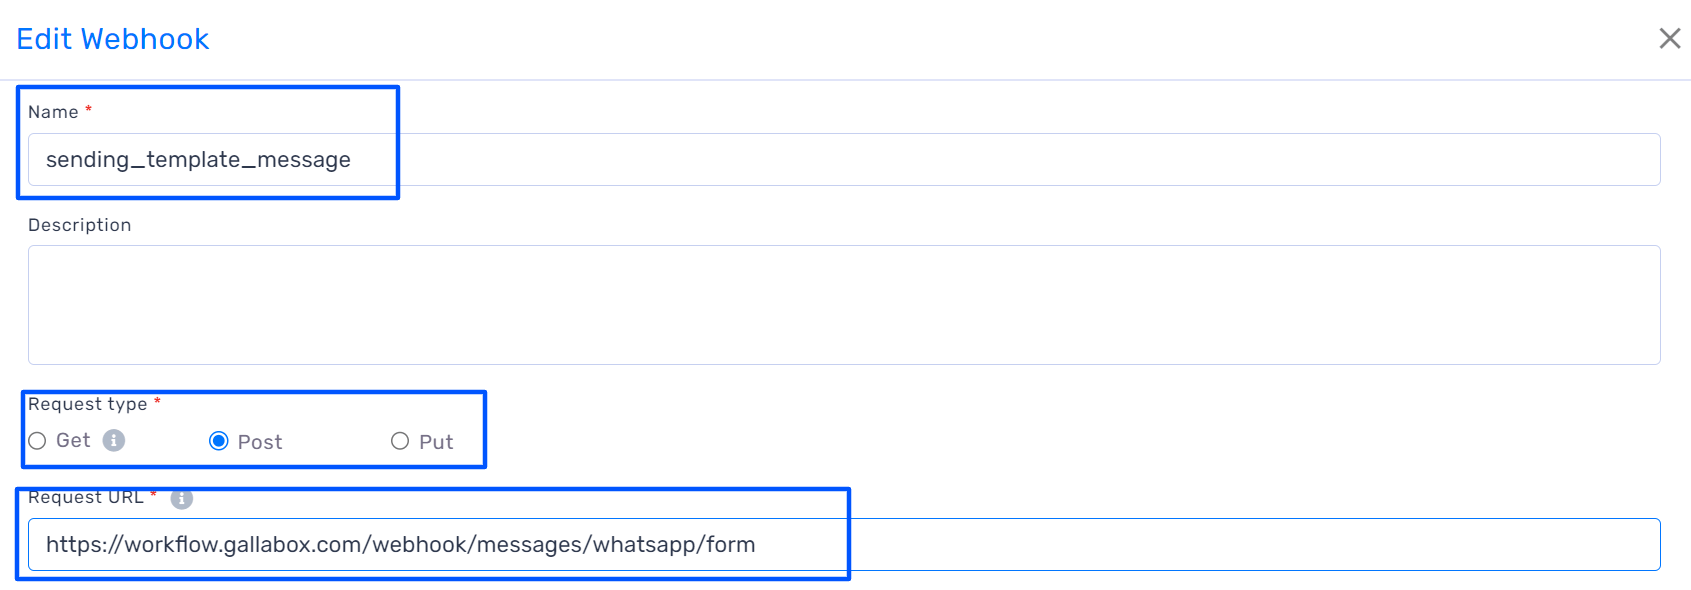
 9. A pop-up will appear to edit the webhook. Edit the name and if you would like to add the description, please add.
Select the Request type as **Post** and for the Request URL paste -
```
https://workflow.gallabox.com/webhook/messages/whatsapp/form
```
We have named the webhook as **sending\_message.**
9. A pop-up will appear to edit the webhook. Edit the name and if you would like to add the description, please add.
Select the Request type as **Post** and for the Request URL paste -
```
https://workflow.gallabox.com/webhook/messages/whatsapp/form
```
We have named the webhook as **sending\_message.**
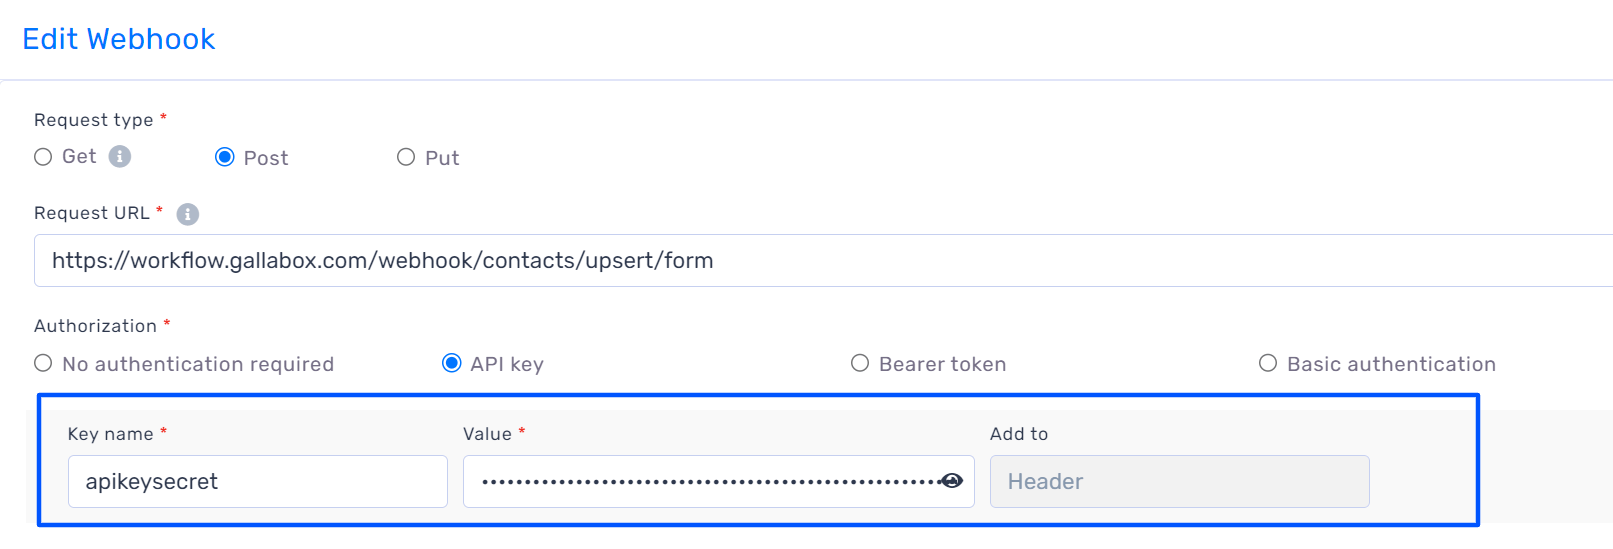
 10. Select the authorization as **API Key**. In place of Key Name paste **apikeysecret** and for the value pass both apikey and apisecret separated with colon (:).
Get the [apikey and apisecret](https://github.com/mangoleaphq/gallabox-docs/tree/main/developer-resources/api-key-and-secret.md) from your Gallabox Account.
10. Select the authorization as **API Key**. In place of Key Name paste **apikeysecret** and for the value pass both apikey and apisecret separated with colon (:).
Get the [apikey and apisecret](https://github.com/mangoleaphq/gallabox-docs/tree/main/developer-resources/api-key-and-secret.md) from your Gallabox Account.
 11. The last Step in editing the webhook is to add the parameters that you would like to push for the sending the automatic message when a lead is created in Kylas CRM.
We have added **channelId**, t**emplateName**, r**ecipientName**, r**ecipientPhones**, and **Name** (***Variable Name defined in the Message template***).
Copy paste the variables like **channelId or** t**emplateName** as they are without any change.
You can add the parameters like headerMediaUrl, headerMediaName, footerButtondomain, and footerButtonUrl depending on the message template you have created.
11. The last Step in editing the webhook is to add the parameters that you would like to push for the sending the automatic message when a lead is created in Kylas CRM.
We have added **channelId**, t**emplateName**, r**ecipientName**, r**ecipientPhones**, and **Name** (***Variable Name defined in the Message template***).
Copy paste the variables like **channelId or** t**emplateName** as they are without any change.
You can add the parameters like headerMediaUrl, headerMediaName, footerButtondomain, and footerButtonUrl depending on the message template you have created.
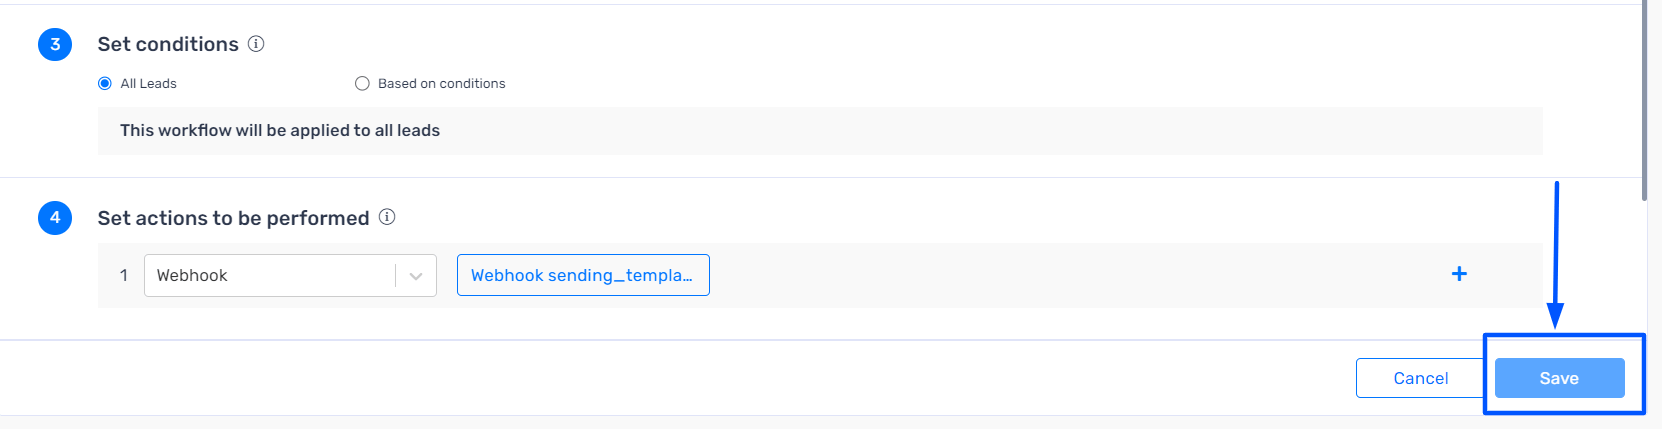
 12. Click on Save to Save the Webhook.
The pop-up will close and you will be redirected to the workflow window and you have to click on Save again.
12. Click on Save to Save the Webhook.
The pop-up will close and you will be redirected to the workflow window and you have to click on Save again.
 The automation is complete and wherever a lead is created in Kylas CRM, an automatic message will be shared with them over WhatsApp.
### Move Contacts
You can push the Contact details from Kylas to Gallabox as soon as the lead gets created or when the lead is updated.
Let's take a step-by-step approach to make this happen.
1. Go to your Kylas CRM and navigate to CRM Settings at the bottom left of the navigation pane.
2. In the CRM Settings, navigate to **Automations**. Under Automations, you will get the Workflow. Click on it.
3. Click on Add a Workflow as shown in the picture below.
4. After clicking, it will ask you to Name your Workflow, and we have named it **upsert\_contacts** for example.
The automation is complete and wherever a lead is created in Kylas CRM, an automatic message will be shared with them over WhatsApp.
### Move Contacts
You can push the Contact details from Kylas to Gallabox as soon as the lead gets created or when the lead is updated.
Let's take a step-by-step approach to make this happen.
1. Go to your Kylas CRM and navigate to CRM Settings at the bottom left of the navigation pane.
2. In the CRM Settings, navigate to **Automations**. Under Automations, you will get the Workflow. Click on it.
3. Click on Add a Workflow as shown in the picture below.
4. After clicking, it will ask you to Name your Workflow, and we have named it **upsert\_contacts** for example.
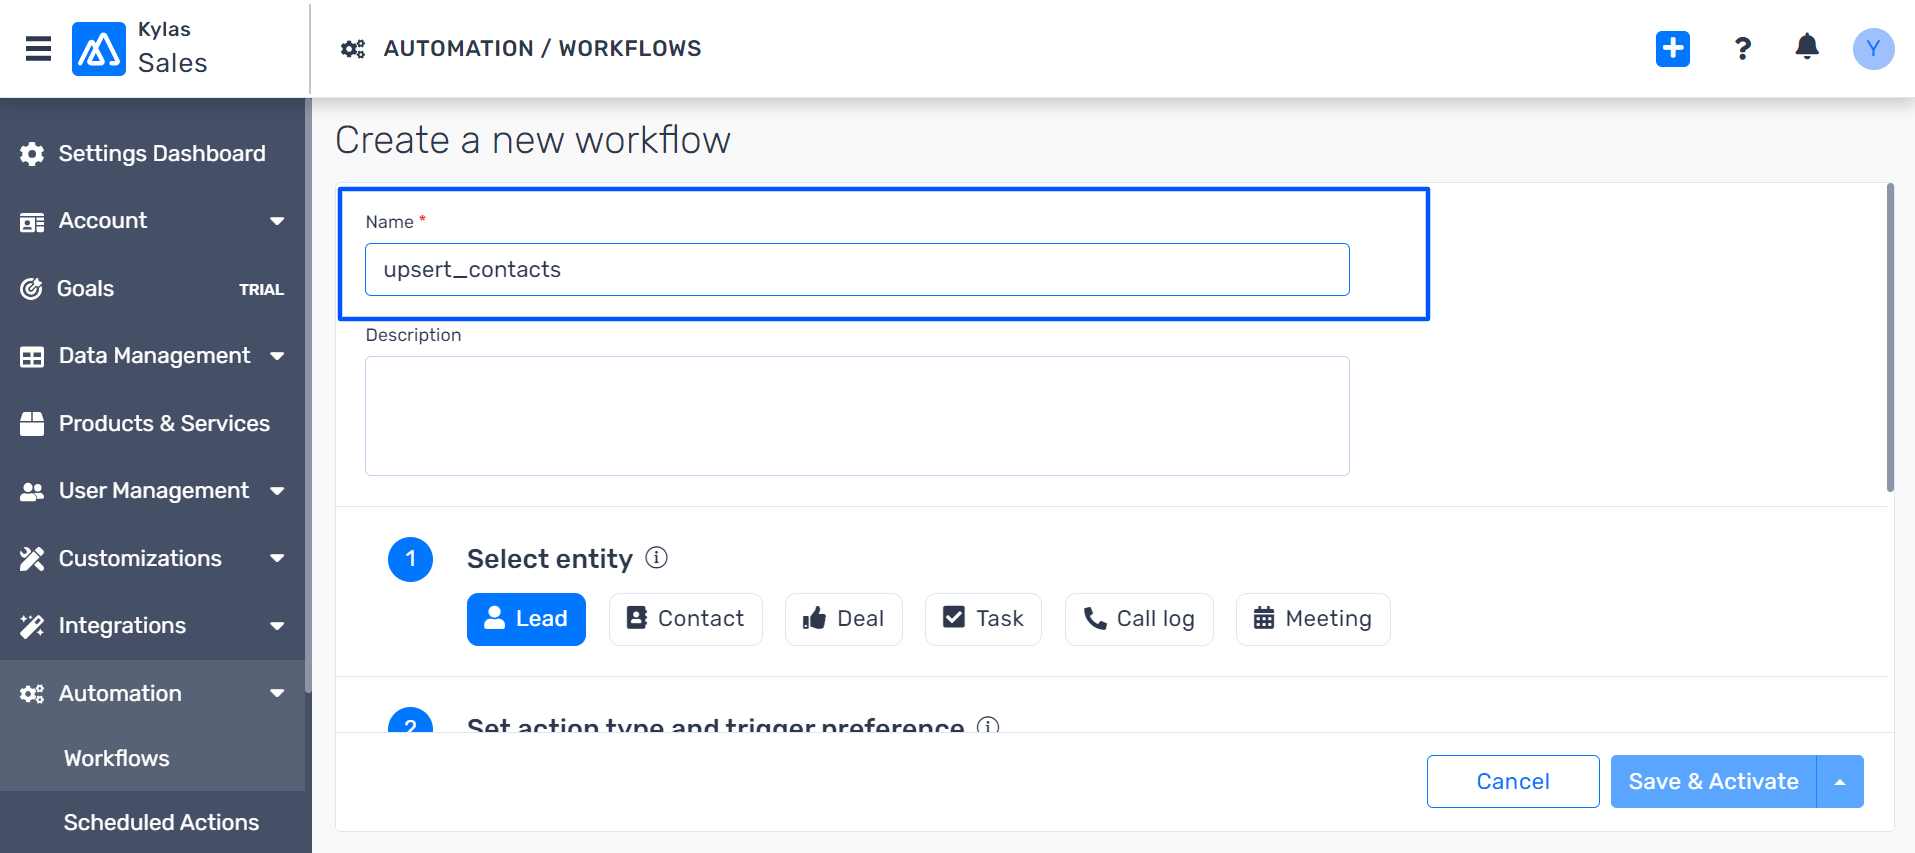 5. Selecting Entity is the next step. Options available for Entity are Lead, Contact, Deal, Task, Call Log, and Meeting. Select from the options you would like to create an automated flow for. We will take Entity - Lead to create an automated flow as an example.
6. Next is selecting an action type and trigger preference to your workflow.
7. We will take the action type as **When a Lead is Created** and the trigger as **Immediately**.
8. Next is setting conditions and the action to be performed automatically. We will take the Condition as **All Leads**, and the action as **Webhook**.
9. A pop-up will appear to edit the webhook. Edit the name and if you would like to add the description, please add.
Select the Request type as **Post** and for the Request URL paste -
```
https://workflow.gallabox.com/webhook/contacts/upsert/form
```
We have named the webhook as **upsert\_contacts.**
5. Selecting Entity is the next step. Options available for Entity are Lead, Contact, Deal, Task, Call Log, and Meeting. Select from the options you would like to create an automated flow for. We will take Entity - Lead to create an automated flow as an example.
6. Next is selecting an action type and trigger preference to your workflow.
7. We will take the action type as **When a Lead is Created** and the trigger as **Immediately**.
8. Next is setting conditions and the action to be performed automatically. We will take the Condition as **All Leads**, and the action as **Webhook**.
9. A pop-up will appear to edit the webhook. Edit the name and if you would like to add the description, please add.
Select the Request type as **Post** and for the Request URL paste -
```
https://workflow.gallabox.com/webhook/contacts/upsert/form
```
We have named the webhook as **upsert\_contacts.**
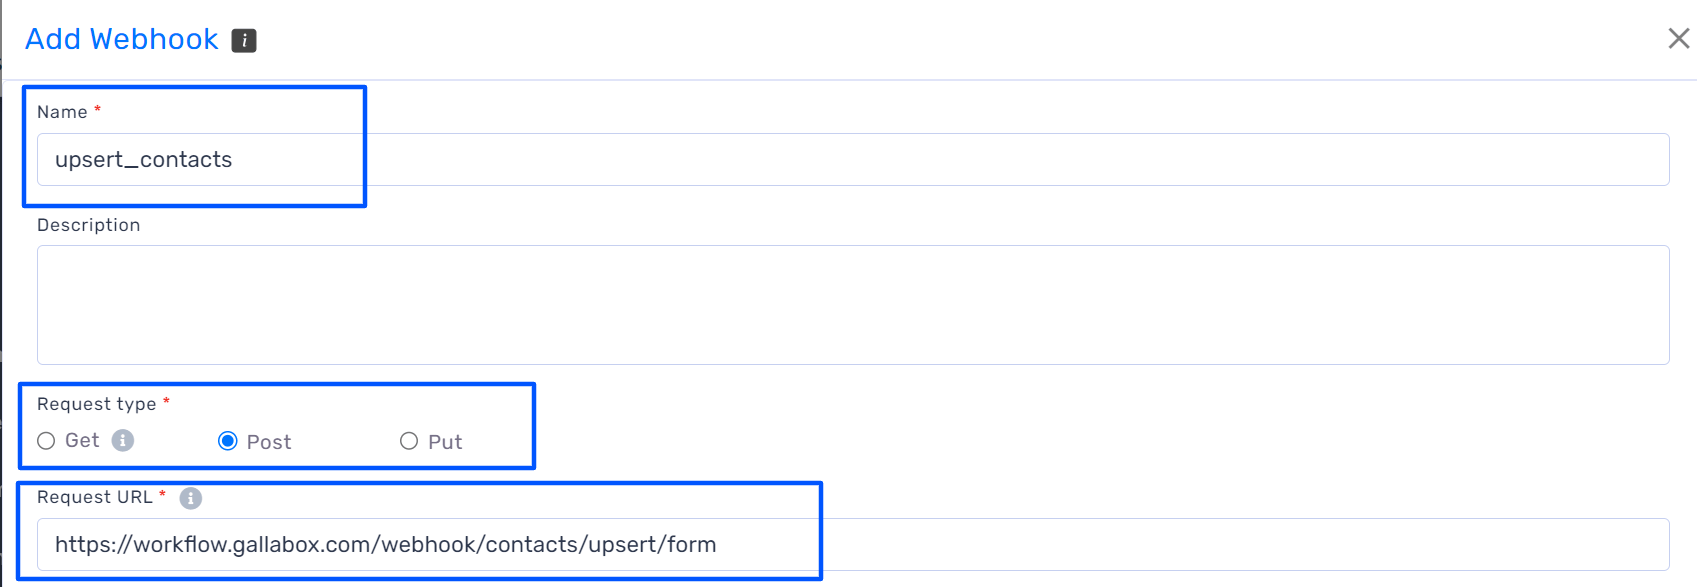 10. Select the authorization as **API Key**. In place of Key Name paste **apikeysecret** and for the value pass both apikey and apisecret separated with colon (:).
Get the [apikey and apisecret](https://github.com/mangoleaphq/gallabox-docs/tree/main/developer-resources/api-key-and-secret.md) from your Gallabox Account.
11. The last Step in editing the webhook is to add the parameters that you would like to push for the lead in Gallabox. We have added Name, **Email**, **Phone**, and **ContactownerId**. You can add the parameters like tags or any field value.
Copy paste the variables like **channelId or** t**emplateName** as they are without any change.
You can add the parameters like headerMediaUrl, headerMediaName, footerButtondomain, and footerButtonUrl depending on the message template you have created.
12. Click on Save to Save the Webhook.
The pop-up will close and you will be redirected to the workflow window and you have to click on Save again.
10. Select the authorization as **API Key**. In place of Key Name paste **apikeysecret** and for the value pass both apikey and apisecret separated with colon (:).
Get the [apikey and apisecret](https://github.com/mangoleaphq/gallabox-docs/tree/main/developer-resources/api-key-and-secret.md) from your Gallabox Account.
11. The last Step in editing the webhook is to add the parameters that you would like to push for the lead in Gallabox. We have added Name, **Email**, **Phone**, and **ContactownerId**. You can add the parameters like tags or any field value.
Copy paste the variables like **channelId or** t**emplateName** as they are without any change.
You can add the parameters like headerMediaUrl, headerMediaName, footerButtondomain, and footerButtonUrl depending on the message template you have created.
12. Click on Save to Save the Webhook.
The pop-up will close and you will be redirected to the workflow window and you have to click on Save again.
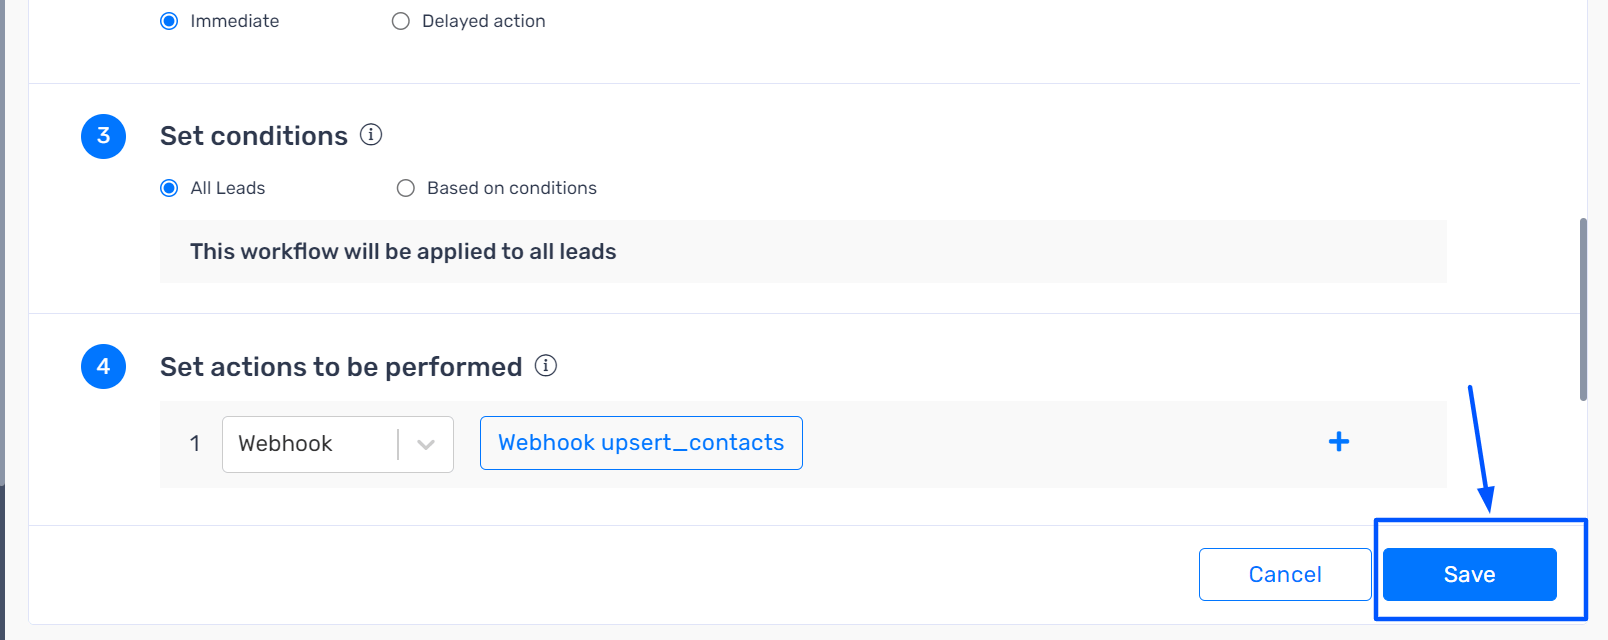 The automation is complete and wherever a lead is created in Kylas CRM, it will be pushed to Gallabox.